

 Lavkush
Git stash is a temporary shelf for your uncommitted work. Run git stash push and Git stores your changed files safely, then cleans your working folder so you can switch branches or fix something urgent. Later, git stash pop takes the work off the shelf and puts it back. This guide walks through the whole cycle step by step, using a tiny project tested with Git 2.43.
Step 1: Check Your Work with git status
Start with a small project. Create two files, commit them, then change one line in homepage.txt so there is real unfinished work to stash:
git init -b main
git add homepage.txt notes.txt
git commit -m "Add homepage and notes"
git status --short
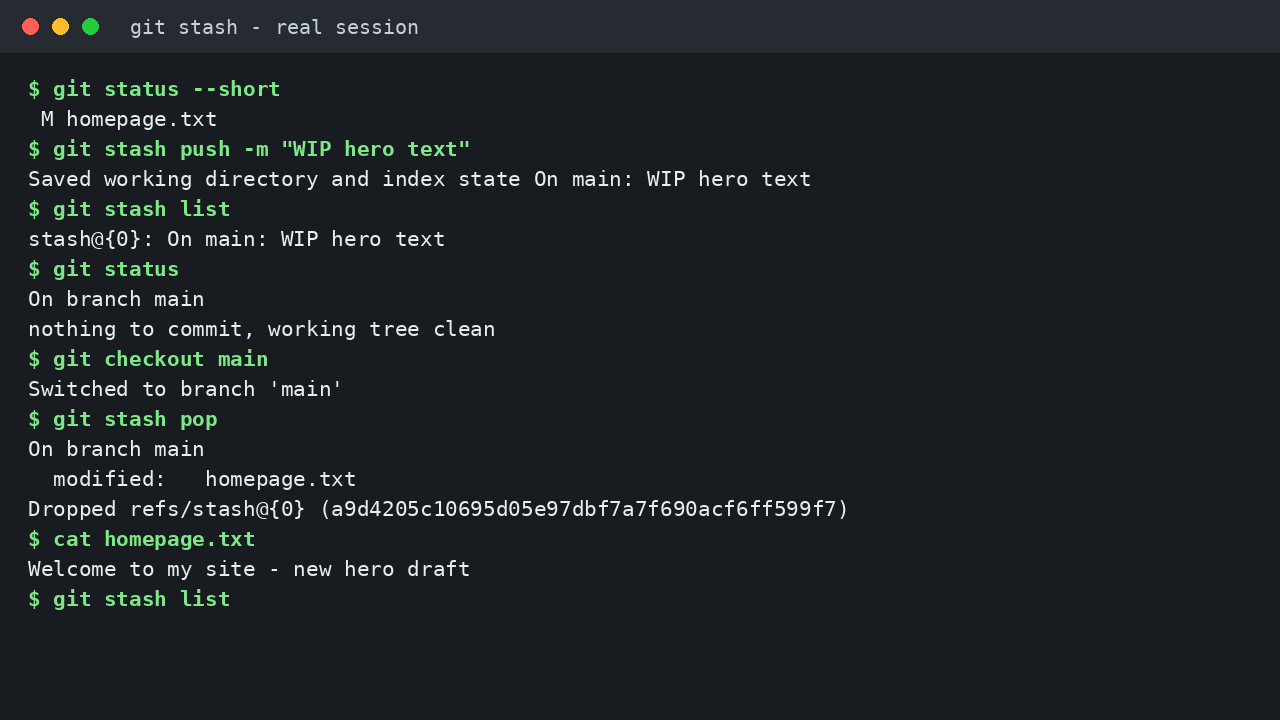
Our session began with homepage.txt containing Welcome to my site, then we changed it to Welcome to my site - new hero draft. The status check printed:
M homepage.txtThe letter M means modified. Always check status before stashing: later the same command proves the shelf worked, because it will report a clean tree. If branches are still new, our guide to Git branches explained, including how to create, switch, merge and delete branches, covers the background for Step 4.
Step 2: Save the Work with git stash push -m
Now shelve the change and give the stash a clear message:
git stash push -m "WIP hero text"Expected output, exactly as printed in our test:
Saved working directory and index state On main: WIP hero textGit saved the modified file as a stash entry, restored it to the last committed version, and kept your message so future you can tell stashes apart. Always use -m. A shelf of unnamed boxes becomes a small mystery you created for yourself. The official git stash documentation describes push as saving local modifications and reverting the working directory to match the last commit.
Step 3: See What Is on the Shelf with git stash list
git stash list
git status
Our list printed:
stash@{0}: On main: WIP hero textAnd git status reported nothing to commit, working tree clean. The newest stash is always stash@{0}; older entries move down to stash@{1} and stash@{2}. That number matters later, because apply and drop can target one entry.
Step 4: Switch Branches and Do the Urgent Job
This is the everyday reason stash exists. You are halfway through the hero text when an urgent fix lands. Your work is shelved and the tree is clean, so switching is safe:
git checkout -b urgent-fix
git commit -am "Add urgent fix"
git checkout main
In our session we created urgent-fix, added a small fix.txt and committed it there as [urgent-fix 1bddeb5] Add urgent fix, then switched back. Without the stash, Git might have carried your half finished edit into the other branch or refused to switch. With it, each job stays in its own place, and nobody needs a messy commit called "temp do not look".
Step 5: Bring the Work Back with git stash pop
Back on main, take the top entry off the shelf and apply it in one move:
git stash pop
cat homepage.txt
git stash list
The pop restored homepage.txt and listed it as modified: homepage.txt. It ended with a line like Dropped refs/stash@{0} plus a long hash, confirming the entry was removed. The file check printed Welcome to my site - new hero draft, so the draft is back word for word. The final list printed nothing: the shelf is empty. We then committed it with git commit -am "Save hero draft".
pop vs apply: Keep the Copy or Not?
git stash apply restores the work but keeps the entry. Use it to test the changes on another branch too, or to keep a safety copy. In our second test we stashed a Second draft, ran apply, and the list still showed stash@{0}: On main: Second draft. Then git stash drop removed it, printing Dropped refs/stash@{0} with its hash. The chapter on stashing and cleaning in the Pro Git book shows the same flow on a larger project. For daily reference, keep our Git commands cheat sheet for beginners with everyday commands nearby.
Step 6: Stash One File, and the Untracked File Note
You do not have to shelve everything. Name a file after -- to stash only that file:
git stash push -m "Only notes file" -- notes.txtThis printed the usual saved message, and git status --short still showed M homepage.txt. Proof it worked: notes.txt went on the shelf while the homepage edit stayed. A later pop brought the notes back.
One catch catches almost everyone once. By default, stash only handles tracked files. A brand new, never added file is untracked, and a normal stash leaves it behind. Add -u, as in git stash push -u -m "Include untracked idea". We tested that too: our untracked idea.txt was shelved.
Step 7: Tidy Up with drop and clear
git stash drop deletes the top entry, or a named one such as git stash drop stash@{1}. git stash clear deletes every entry at once. We ran clear at the end of our session and the list was empty. Be careful: a dropped stash is very hard to recover, so drop only entries already committed or truly unwanted.
| Command | Restores the work? | Keeps the entry? | Best for |
|---|---|---|---|
git stash pop |
Yes | No, dropped after a clean restore | The normal case: resume work and tidy up in one step |
git stash apply |
Yes | Yes | Testing the same changes elsewhere, or keeping a safety copy |
git stash drop |
No | No, deletes one entry | Removing a copy after apply, or deleting work you no longer need |
When pop Reports a Conflict
If the same lines changed on the branch while your work was shelved, pop can report a conflict, just like a merge. We tested this: after stashing a hero line, we committed a different hero line on main, then popped. Git printed CONFLICT (content): Merge conflict in homepage.txt, left markers in the file between Updated upstream and Stashed changes, and added the reassuring line The stash entry is kept in case you need it again. Nothing is lost. Fix the markers by choosing the final text, then run git add homepage.txt. Our guide to how to fix a Git merge conflict step by step walks through reading those markers calmly.
Common Mistakes and Troubleshooting
Forgetting what you stashed. Nobody remembers an unnamed stash weeks later. Always push with -m and a message that names the task, and check git stash list in your weekly tidy up.
Expecting untracked files to be stashed. They are not, by default. If a new file stayed behind, that is normal. Use git stash push -u next time when new files must travel too.
Using stash as long term storage. The shelf is for hours or days, not months. Important work belongs in a commit on a branch.
Popping onto the wrong branch. A stash can be applied on any branch. Check yours with git status before you pop.
Panicking at a pop conflict. The entry is kept when a pop conflicts. Fix the file line by line, or clean up the practice file and try again.
Clearing the whole shelf by habit. git stash clear removes everything in one go. List first and drop one by one.
Frequently Asked Questions
Is stashed work committed or saved anywhere online?
No. A stash is a local entry in your own repository. It is not a commit and it is not pushed to GitHub. Commit and push work you cannot afford to lose.
How many stashes can I keep?
As many as you create. They stack in order, with the newest at stash@{0}. In practice, keep the list short so every entry still has a clear purpose.
What is the difference between pop and apply?
Both restore the changes. Pop deletes the entry after a successful restore, while apply keeps it. Use apply when you want the safety copy, then drop it yourself.
Can I stash only one file?
Yes. Use the file form, git stash push -m "message" -- notes.txt, and only that file is shelved. Everything else stays in your working folder.
Conclusion
Git stash is a shelf, not a bin and not a backup. Check status, push with a clear message, do the urgent job on a clean tree, then pop the work back and commit it. Use apply to keep a copy, drop only after reading the list, and add -u for new files. Practise once on a tiny file, as we did here, and the next urgent fix will take two minutes instead of ruining your afternoon.



Leave a Comment