

 Lavkush
A Python virtual environment is a private folder that holds its own Python interpreter copy and its own set of installed packages, separate from every other project on your computer. You create one with a single built-in command, python -m venv .venv, activate it, and from then on pip install puts packages into that folder only. In this guide you will learn why environments matter, how to create, activate and rebuild one step by step, and how to fix the problems beginners meet most, with every command tested on Python 3.12.
Why Do You Need a Virtual Environment at All?
Picture two projects on one laptop. Project A needs version 1 of a library. Project B needs version 2 of the same library. If both projects share one global Python, installing version 2 for Project B can break Project A, and the error will appear days later, in code you did not touch, which is a special kind of frustrating.
A virtual environment solves this with simple isolation: one folder per project, one package set per folder. The official venv documentation describes an environment as a directory with its own independent set of packages, created on top of your existing Python installation and isolated from it by default. The tool is called venv, it ships with Python 3.3 and later, and it costs nothing. There is no good reason to skip it, even for small scripts you plan to share.
What You Need Before You Start
You need Python 3 installed and reachable from your terminal. Check with python --version on Windows or python3 --version on Mac and Linux. If Python is missing, our step-by-step guide to how to install Python on Windows and set up VS Code gets you to a working setup first, including the famous PATH checkbox that everyone forgets once.
Step 1: Create the Environment
Open a terminal inside your project folder and run:
python -m venv .venvOn Mac and Linux, use python3 -m venv .venv if python is not available. Let us unpack the command, because every part earns its place. -m tells Python to run a module as a program. venv is the module. .venv is the folder to create; the name is a convention, and the leading dot keeps it quietly out of the way. Python builds the folder with a copy or link of the interpreter, a pip of its own, and a small pyvenv.cfg file that records where the base Python lives.
Step 2: Activate It
Creating the folder is not enough. You must activate the environment in each new terminal window, so that python and pip point inside the folder:
| System and shell | Activate command |
|---|---|
| Windows, Command Prompt | .venv\Scripts\activate.bat |
| Windows, PowerShell | .venv\Scripts\Activate.ps1 |
| Mac and Linux, bash or zsh | source .venv/bin/activate |
On Windows PowerShell, if activation is blocked by the execution policy, the official docs suggest allowing local scripts for your user once with Set-ExecutionPolicy -ExecutionPolicy RemoteSigned -Scope CurrentUser. When activation works, your prompt gains a (.venv) prefix, like a name badge that says this terminal now works for this project only.
Step 3: Prove It Works, Then Install Something
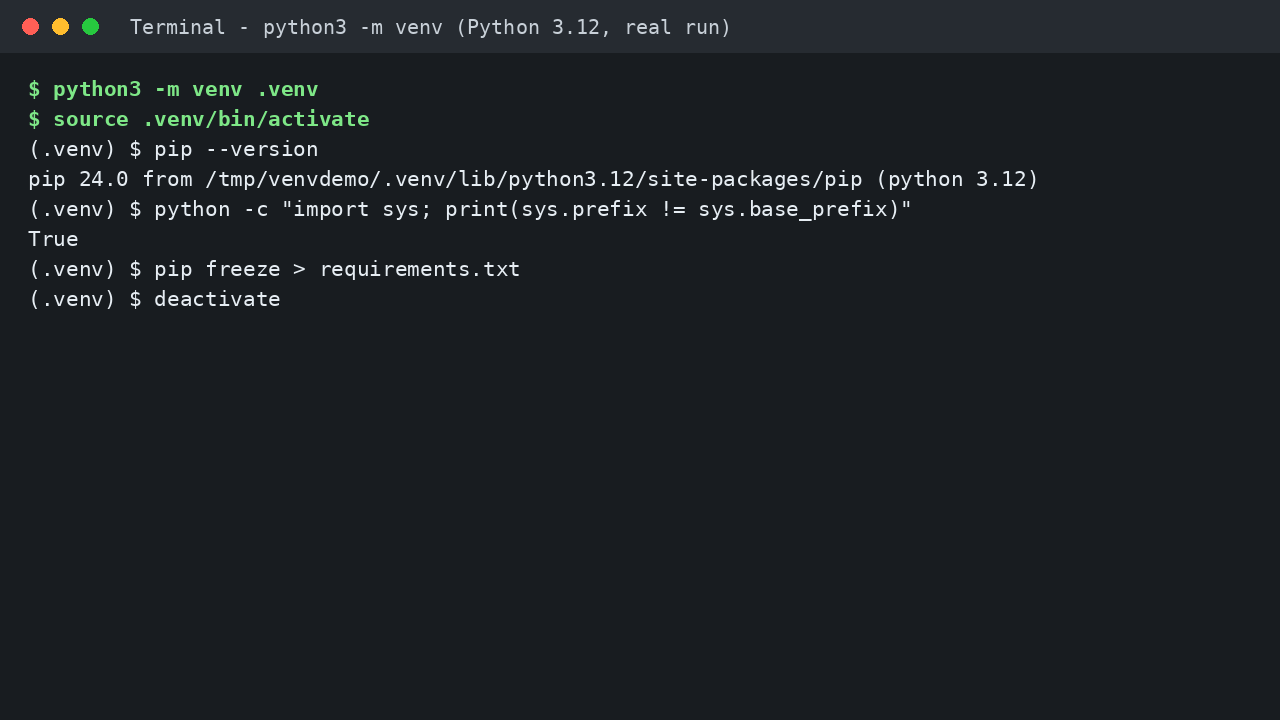
Do not trust the name badge alone. Run these two checks (tested on Python 3.12.3):
pip --version
python -c "import sys; print(sys.prefix != sys.base_prefix)"
The first command should report a pip path inside your project's .venv folder, not a system path. The second prints True when Python is genuinely running from a virtual environment, because inside one, sys.prefix points at the environment while sys.base_prefix still points at the base install. Now install packages as usual, for example pip install requests. They land in .venv only. Your other projects will never know.
Step 4: Save and Rebuild with requirements.txt
An environment is disposable by design; the recipe to rebuild it is what you keep. Save the recipe with:
pip freeze > requirements.txtThat file lists every installed package with its exact version. Commit requirements.txt to Git, and never commit the .venv folder itself; since Python 3.13, venv even writes a starter .gitignore inside the folder to help with exactly that. On a new machine, anyone can rebuild your setup in two lines:
python -m venv .venv
pip install -r requirements.txt
Remember the second line runs after activation. The Python Packaging Authority's guide to pip and virtual environments walks through the same create, activate, install flow if you want a second explanation. And when you finish working, deactivate returns the terminal to the global Python; the folder stays on disk, ready for tomorrow.
A Complete Tiny Workflow, Start to Finish
mkdir myproject
cd myproject
python -m venv .venv
source .venv/bin/activate
pip install requests
pip freeze > requirements.txt
deactivate
That is the whole habit. It takes under a minute once your fingers learn it, and it quietly prevents the most confusing category of beginner Python bugs: the ones caused by the wrong package version being installed in the wrong place. It also makes helping you much easier: when someone asks what your project needs, you send one small text file instead of a paragraph of guesses, and they can rebuild your exact setup on their own machine and see the same behaviour you see. The habit also pairs well with structuring your code properly; our guide to Python function arguments: positional, keyword, default, args and kwargs is a good next step once your project runs in its own clean environment.
Common Mistakes and Troubleshooting
Forgetting to activate. The number one issue. You install a package, Python says the module is missing, and the package is sitting happily in the global Python instead. Check for the (.venv) prompt prefix before every pip install.
Committing .venv to Git. The folder is large, machine-specific and rebuildable. Commit requirements.txt instead, and add .venv/ to your .gitignore.
Moving or renaming the project folder. Environments remember absolute paths, so a moved .venv often breaks. The official advice is simple: delete it and recreate it from requirements.txt. It takes a minute and always works.
Two Pythons, one confused terminal. If pip --version shows a path outside .venv after activation, close the terminal, open a fresh one in the project folder and activate again. Stale shells cause most of these mysteries. If errors still mention modules you did install, our guide to Python error handling with try, except and finally helps you read the traceback calmly instead of guessing.
Using one environment for everything. That recreates the original problem with extra steps. One project, one environment. Always.
Frequently Asked Questions
Is venv built into Python, or do I install it?
It is built in. The venv module has been part of the standard library since Python 3.3, so python -m venv .venv works on a plain install with nothing extra to download.
What should I name my environment?
Use .venv. It is the most common convention, editors such as VS Code detect it automatically, and future you will always know what the folder is.
Does a virtual environment contain my project code?
No. Your code lives in the project folder as usual. The environment folder holds only the interpreter links and installed packages, and you should never place your own files inside it.
venv or virtualenv: which should a beginner use?
Start with venv. It is built in, well documented and enough for nearly every beginner project. The older third-party virtualenv tool adds a few advanced options you can explore later if you ever need them.
Conclusion
One command creates the environment, one command activates it, and one small file, requirements.txt, makes the whole setup reproducible anywhere. That tiny routine is the difference between "it works on my machine" as a joke and "it works on my machine" as a promise. Make it the first thing you do in every new Python project, starting with your very next one.


Leave a Comment